Administrator's Guide
Installation
sign pro PDF is shipped in an executable installer package:
Wacom-SignPro-VersionId.exe
The installer will copy Wacom-branded images into:
Program Files\Wacom sign pro PDF\STU
Standard Installation
To perform a standard installation, run the .exe file from File Explorer or a command line. When using the command line, a number of installer options are available:
Switches
| Switch | Action |
|---|---|
/quiet | Runs with a minimal user interface. Note: the command line must be elevated and run as administrator for this option. |
/passive | Similar to /quiet, but the UI is displayed to monitor progress. |
/norestart | Suppresses any attempt to reboot on completion. |
/log pathname | Logs the installer action in files based on the specified pathname. By default, log files are created in: C:\Users\username\AppData\Roaming\Wacom\Sign_pro_PDF.exe\versionnumber\ |
/repair | Repairs an existing installation. |
/uninstall | Uninstalls the application. |
Properties
| Property | Action |
|---|---|
Language or LCID | Sets the language to one of the supported languages specified in Value, for example French: Language=FR or LCID=1036. A full list can be found below in the Language codes section. |
CreateDesktopIcon | Presets the "Create Desktop Icon" option:=0 for not selected (default)=1 for selected |
LaunchSignPro | Starts sign pro PDF after installing with the /quiet option: LaunchSignPro=1 |
NoPdfPrint | Setting NoPdfPrint=1 disables novaDPF installation, enabling sign pro PDF to be used by systems with ARM CPUs. NB: "Print to sign pro" is not available on ARM-based systems. |
StuDriver | Presets the "Install STU driver" option:=0 for not selected (default)=1 for selected |
adminConfig | Copies the specified file to administratorConfig.xml in the installation folder. The file contains a number of settings detailed below. |
stuCustomImagesFolder | Sets an alternate folder to be the source of the STU's idle images. If there are images in this alternate folder, they'll be used instead. Otherwise, the original images will be shown. Note: The installer will not copy files there, but it will be used by SPP to read the images from. The custom folder should follow the original format of the default folder, containing the folders (and within each of them the custom images you wish to display): STU-5x0 STU-500 STU-430 STU-300 More information on stuCustomImagesFolder can be found below in the STU Image section. |
STU Image
On startup, if a signature pad is connected, an idle image will appear on the device.

This image will remain after sign pro PDF is closed. Whether sign pro PDF is open or closed, the idle image will no longer appear if the device is removed and reattached unless sign pro PDF is relaunched.
If sign pro PDF is opened and a signature is signed, the idle image will return upon completion of signing.
A different image will appear to match the various STUs so that it fits best for the given device’s resolution. The idle images are contained by default in C:\Program Files (x86)\Wacom sign pro PDF\STU. The contents of the folder are covered further in the table below:
| Folder | STU type(s) | Image size | Color |
|---|---|---|---|
| STU-300 | STU-300 | 396 x 100 | no |
| STU-430 | STU-430 | 320 x 200 | no |
| STU-500 | STU-500 | 640 x 480 | no |
| STU-5x0 | STU-520, STU-530, STU-540, STU-541 | 800 x 480 | yes |
Language codes
| Language | Code | LCID |
|---|---|---|
| German | DE | 1031 |
| English | EN | 1033 |
| Spanish | ES | 1034 |
| French | FR | 1036 |
| Italian | IT | 1040 |
| Japanese | JA | 1041 |
| Korean | KO | 1042 |
| Dutch | NL | 1043 |
| Polish | PL | 1045 |
| Portuguese (Brazil) | PT-BR | 2070 |
| Russian | RU | 1049 |
| Chinese (Simplified) | ZH-CN | 2052 |
| Chinese (Traditional) | ZH-TW | 1028 |
administratorConfig.xml
The configuration file can contain one or more of the following settings: (NB: Any value set this way will not be changeable in the Settings dialogs in the application)
<?xml version="1.0" encoding="UTF-8"?>
<AdminConfiguration>
    <DefaultSignatureDevice>--string--</DefaultSignatureDevice>
    <DisableLicenseExpiryWarning>--bool--</DisableLicenseExpiryWarning>
    <DocumentsSaveLocation>--pathname--</DocumentsSaveLocation>
    <EncryptionCertificatePath>--pathname--</EncryptionCertificatePath>
    <IsSignatureInformationDisplayed>--bool--</IsSignatureInformationDisplayed>
    <LicenceKey>--jwt.license-string--</LicenceKey>
    <SignatureDeviceSelectionMode>--string--</SignatureDeviceSelectionMode>
    <SigningCertificateThumbprint>--thumbprint--</SigningCertificateThumbprint>
    <SigningCertificatePath>--pathname--</SigningCertificatePath>
    <SignatureFormat>--option--</SignatureFormat>
</AdminConfiguration>
DefaultSignatureDevice
Specifies the default device used for signing. Only required if the selection mode is DefaultDevice. Device names match those returned by ISignatureDevice. For example:
<DefaultSignatureDevice>DTH-1152</DefaultSignatureDevice>
DisableLicenseExpiryWarning
To set the licence countdown expiry in the UI to display or not (true/false). For example:
<DisableLicenseExpiryWarning>true</DisableLicenseExpiryWarning>
DocumentsSaveLocation
To set the default directory used to save documents. For example:
<DocumentsSaveLocation>c:\Wacom%username%\SignProPDF</DocumentsSaveLocation>
EncryptionCertificatePath
To enable signature encryption using a pre-installed certificate, supply the certificate pathname, for example:
<EncryptionCertificatePath>c:\cert\cert.cer</EncryptionCertificatePath>
Note: The sign pro license must also be Encryption enabled. Supported file formats are X.509 Certificate (.cer) files.*
IsSignatureInformationDisplayed
To display or hide the signatory name, reason for signing, and date in the signature image, where true displays it andfalse hides it. For example:
<IsSignatureInformationDisplayed>true</IsSignatureInformationDisplayed>
LicenceKey
To set the sign pro license during installation, include the full license string here:
<LicenceKey>jwt.license-string</LicenceKey>
The string is the value which would otherwise be pasted into the Upgrade dialog in About.
More information about licensing can be found in the Quick Start Guide here.
SigningCertificateThumbprint
To use a pre-installed certificate for signing, use its thumbprint to identify it.
The thumbprint can be viewed in properties in the Windows Certificate Manager (Certmgr.msc), for example:
43aee632f5e1066ac006ca1550f82f91ff5867dd
SigningCertificatePath
As an alternative to a thumbprint, to use a pre-installed certificate for signing, use its pathname to identify it. For example:
<SigningCertificatePath>c:\cert\mySignProPDF.p12</SigningCertificatePath>
Supported file formats are PKCS#12 (.p12, .pfx) files.
- If a signing certificate has already been obtained, it can be installed in the Windows key store.
- When the certificate is stored as a file, and if it was created with a password, this password will be requested.
- If users do not wish to insert passwords, the Windows key store certificate method should be employed.
SignatureDeviceSelectionMode
Specifies the selection mode for the device. Available selection options are: Automatic, DefaultDevice, & UserSelection.
<SignatureDeviceSelectionMode>Automatic</SignatureDeviceSelectionMode>
SignatureFormat
Selects the signature format as FSS (default) or ISO. For example:
<SignatureFormat>ISO</SignatureFormat>
The admin config setting uses the ISO 2014 format. Users wishing to use ISO 2021 format cannot do this within the admin config and must set this in the UI.
Additionally, the sign pro license must be ISO-enabled to use this option.
As there's no validation of the file type through AdminConfig, the format can be set to any value. Whether it works or not depends on Windows/.NET finding a certificate within the given format.
Other values
Two values cannot be changed in the administratorConfig.xml. They must instead be set in the user.config file, typically contained in %AppData%\Roaming\Wacom\Sign_Pro_PDF.
DefaultCertificateDirectory
To set the default directory used to store certificates. For example:
<setting name="DefaultCertificateDirectory" serializeAs="String">
    <value>C:\temp\default-certificate-directory</value>
</setting>
DefaultEncryptionCertificatePath*
To set the default folder path for encryption certificates if no specific path is provided in EncryptionCertificatePath. For example:
<setting name="DefaultEncryptionCertificatePath" serializeAs="String">
    <value>c:\Wacom%username%\public.cer</value>
</setting>
*NB: While this cannot be set via adminConfig, certificate path configuration via adminConfig is supported via
EncryptionCertificatePath.
Installation Examples
Wacom-SignPro-VersionId.exe /passive /log C:\Temp\SPLOG.txt Language=FR adminConfig=C:\Temp\SPConfig.txt stuCustomImagesFolder=C:\Temp
In this example, the user has set multiple additional parameters during installation, including:
- Running the installer in passive mode.
- Setting a location for a log file to be written to.
- Setting the installer to run for the French language.
- Setting a custom config file for the installation (in these examples,
C:\Temp\SPConfig.txtwill be used). - Setting a folder for containing custom images for STU devices.
As a prerequisite, it is necessary to already have a Signing Certificate installed, either:
- In Windows' user key store, or
- Saved locally.
First, create a file, SPConfig.txt.
If using Windows' user key store, add the following content:
<?xml version="1.0" encoding="UTF-8"?>
<AdminConfiguration>
    <LicenceKey>INSERT_LICENSE_HERE</LicenceKey>
    <DocumentsSaveLocation>INSERT_PATH_HERE</DocumentsSaveLocation>
    <SigningCertificateThumbprint>INSERT_CERTIFICATE_THUMBPRINT</SigningCertificateThumbprint>
</AdminConfiguration>
Alternatively, if a certificate was installed locally and saved as a file, add the following content:
<?xml version="1.0" encoding="UTF-8"?>
<AdminConfiguration>
    <LicenceKey>INSERT_LICENSE_HERE</LicenceKey>
    <DocumentsSaveLocation>INSERT_PATH_HERE</DocumentsSaveLocation>
    <SigningCertificatePath>INSERT_PATH_HERE</SigningCertificatePath>
</AdminConfiguration>
Then run this command:
Wacom-SignPro-VersionId.exe /quiet /log C:\Temp\SignProLog.txt adminConfig=C:\Temp\SPConfig.txt
- This command runs the installer in silent mode, removing any FTE prompts. It also:
- Sets a location for a log file to be written to, and
- Sets a custom config file for the installation.
With the above admin config settings, this will then set a license, a save location for documents, and (depending on what was specificied in the config file) use a certificate either in Windows' user key store or saved locally.
To set a license through the admin config, create a config file, SPConfig.txt. Add the following content to the file:
<?xml version="1.0" encoding="UTF-8"?>
<AdminConfiguration>
    <LicenceKey>INSERT_YOUR_LICENSE_HERE</LicenceKey>
</AdminConfiguration>
Then run this command:
Wacom-SignPro-VersionId.exe adminConfig=C:\Temp\SPConfig.txt
Application Data
Application data is saved in the hidden folder AppData:
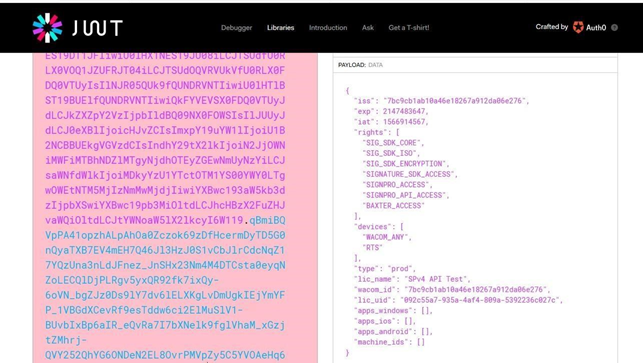
You can then view the settings including the expiry date exp.
By hovering the mouse on the exp field, the date value will be displayed in plain text.
C:\Users\username\AppData\Roaming\Wacom
Two folders are maintained:
- Data: contains a database
lite.dbwhich records recently viewed and signed filenames. - Sign_Pro_PDF_exe: extended with a unique identifier, contains the file
user.config.
user.config records settings in XML made in the application, including the license.
To reset the application to its installation state, delete the Wacom folder.
Further Information
For further information, please see the online sections here: sign pro PDF version 4 FAQs.