Concepts
This series of Wacom products is now discontinued and support for them is no longer offered.
CDL version 1
Version 1 of the CDL is available for a range of development platforms
- Windows (Classic and UWP)
- iOS
- Android
Types of supported devices include:
- Wacom PHU-111 Clipboard
- Wacom Smartpad e.g. Folio, Slate
- Wacom Intuos
- Apple Pencil
Regardless of the development platform and device type a consistent approach is provided for application development:
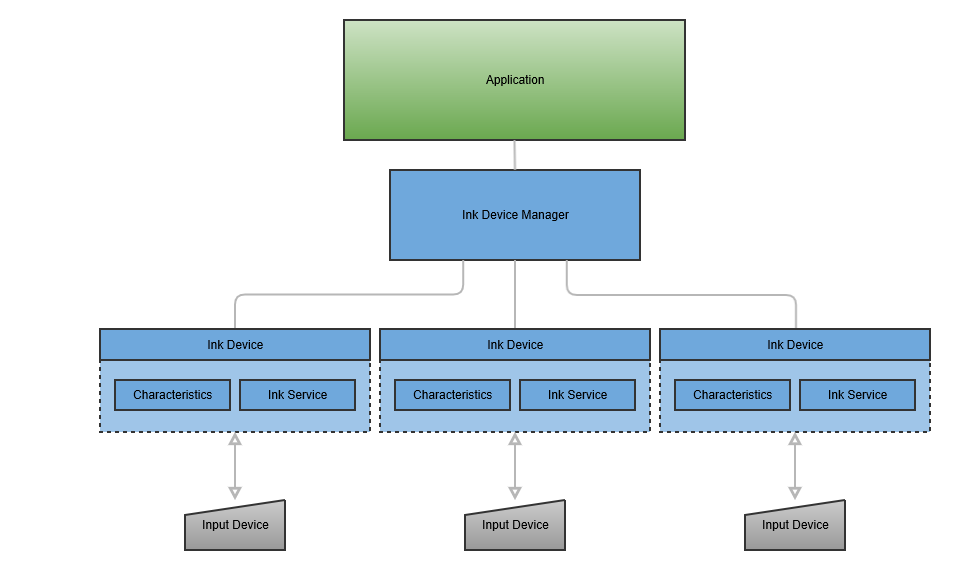
Ink Device Manager
Use the device manager to receive a list of named devices that are available for connection
Ink Device
Connect to a named device and retrieve properties
Ink Service
Use the service callback mechanism to receive data from the connected device. Depending on the type of device, data can be in the form of realtime pen strokes, or a file transfer of a completed page.
To view operation of the CDL diagrammatically:
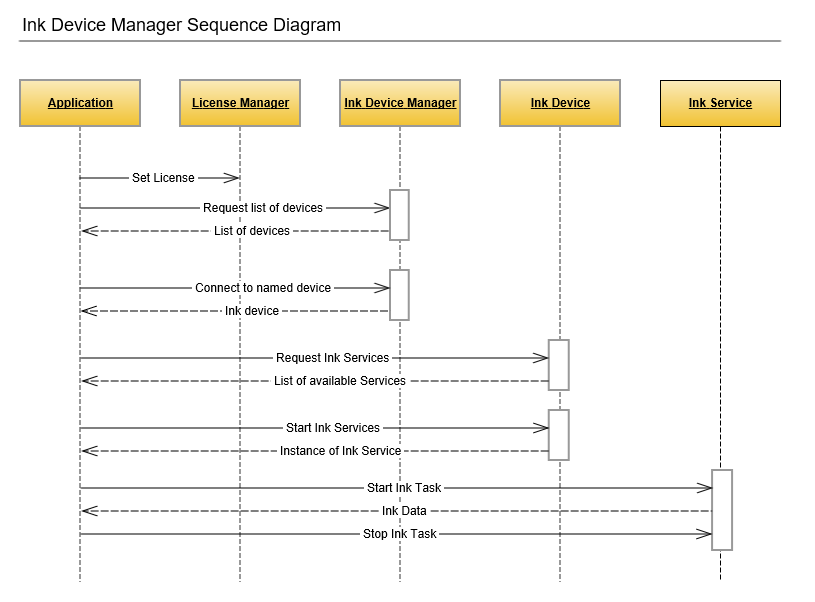
To illustrate the CDL, the samples which follow are taken from the Android version of the CDL SDK. A similar approach is followed on all platforms where sample projects are supplied as part of the CDL SDK.
1. Initialize License
You will need a CDL license, issued for your application. The easiest way to initialize your license is to add it as an asset to your application and then verify it using LicenseBootstrap.
AssetManager assetManager = getAssets();
try {
    InputStream license = assetManager.open("license.lic");
    LicenseBootstrap.initLicense(this.getApplicationContext(), LicenseBootstrap.readFully(license));
} catch (IOException | LicenseTokenException e) {
    e.printStackTrace();
}
2. Scan for Wacom Ink Devices
In order to find the available Wacom Ink Devices start a scan. To do this create a new instance of InkDeviceScanner. It will scan for Wacom Ink Devices over bluetooth. The devices should be in pairing mode in order to be found.
- Note: To enter pairing mode on a Wacom SmartPad press and hold the button on the device for 6 seconds.
The constructor of the InkDeviceScanner takes one parameter: context.
InkDeviceScanner inkDeviceScanner = new InkDeviceScanner(this);
To start scanning for devices, call the scan() method of the InkDeviceScanner. It takes a single parameter - a callback through which it reports the devices that were found.
When the scanner finds a device, it is reported as InkDevice. This object provides useful information such as the devices's name and address.
inkDeviceScanner.scan(new InkDeviceScanner.Callback() {
      @Override
      public void onDeviceFound(InkDeviceInfo inkDeviceInfo) {
          ...
      }
});
When scanning is complete you should stop the scanner.
inkDeviceScanner.stop()
3. Create New Ink Device
After a device was found from the scanner create an instance of InkDevice. It is used to communicate with and execute commands on the Wacom Ink Device. createClient takes two parameters: context and InkDevice. InkDevice should usually be created via the dedicated InkDeviceFactory. The createClient method takes two parameters: context and inkDeviceInfo - the information which helps it create the right type of client for the Ink device and connect to it. If you have already paired with a device before there is no need to scan for it again. You can just serialize the InkDeviceInfo and reuse it to recreate the the client.
inkDevice = InkDeviceFactory.createClient(this, inkDeviceInfo);
When you have finished with the ink device, or if you need to create a new client, you should first dispose it:
inkDevice.dispose();
4. Connect to Wacom Ink Device
After creating the InkDevice, you need to connect to it.
The connect method takes three parameters:
InkDeviceInfo- the information about the device (found during scan or persisted from previous usages).appId- a unique identifier of the application. It is used by the Ink devices to pair with the application.ConnectionCallback- the callback through which to be notified once the connection was successfully established.
inkDevice.connect(inkDeviceInfo, appId, new ConnectionCallback() {
      @Override
      public void onConnected() {
          ...
      }
});
5. Device Services
There are certain things that a Wacom Ink Device can do but in most cases there are differences between one device and another. In CDL these features are grouped into sets called Device Services. To get the feature sets of the currently connected Ink device you can use the method getAvailableDeviceServices(), which will return a List of DeviceServiceTypes.
ArrayList<DeviceServiceType> availableDeviceServices = inkDevice.getAvailableDeviceServices();
Therefore, you can easily check if the Device Service you are interested in (for example - File Transfer Service) is available:
availableServices.contains(DeviceServiceType.FILE_TRANSFER_DEVICE_SERVICE)
Some of the Device Services (such as FileTransferDeviceService and LiveModeDeviceService) cannot work in parallel - if one of them is enabled, the other cannot be started until the first one is stopped.
However, Device Services like EventDeviceService can work while there is another enabled service.
EventDeviceService provides the means to subscribe for and receive events sent by the device. Examples for such events are changes in the battery state, or when the device expects a certain action from the user - for example pressing the button on the Ink Device.
To be able to receive these events you should first of all check if EventDeviceService is available and if so, execute its subscribe method, passing a callback through which events will be dispatched later on. There are three main types of events you will receive:
Event- the basic event, broadcast by the Ink device (e.g. change of the battery state).UserActionExpected- when a user action is expected by the user.UserActionCompleted- tells you that the user action previously requested is now completed (either successfully or not).
if(inkDevice.getAvailableDeviceServices().contains(DeviceServiceType.EVENT_DEVICE_SERVICE)){
      ((EventDeviceService) inkDevice.getDeviceService(DeviceServiceType.EVENT_DEVICE_SERVICE)).subscribe(new EventCallback() {
            @Override
            public void onEvent(InkDeviceEvent event, Object value) {
                  ...
            }

            @Override
            public void onUserActionExpected(UserAction userAction) {
                  ...
            }

            @Override
            public void onUserActionCompleted(UserAction userAction, boolean success) {
                  ...
            }
      });
}
Ink devices have properties which describe some of their characteristics such as name, battery state, id and other. You can easily acquire them using the getProperties method, passing a List of the properties you are interested in. As a result, in the callback you should receive a TreeMap with property type - value pairs. The tree map keeps the same order as the list. However, if a parameter is not supported by the current Ink Device it will be omitted.
List<InkDeviceProperty> properties = Arrays.asList(InkDeviceProperty.values());

inkDevice.getProperties(properties, new GetPropertiesCallback() {
      @Override
            public void onPropertiesRetrieved(TreeMap<InkDeviceProperty, Object> properties) {
                  ...
            }
      });
5.1. Device Alerts
Alerts are unexpected events that may lead to different behavior of the InkDevice. Subscribe to them in order to be able to maintain a proper communication with the InkDevice.
inkDevice.subscribe(new AlertsCallback() {
    @Override
    public void onAlert(InkDeviceAlert alert) {
        ....
    }
});
5.2. FileTransfer- Transfer Files From Ink Device
In this section, we want to receive and preview all the files created with the Wacom Ink Device. To do so, after making sure that the FileTransferDeviceService is supported by the current device, we should get its instance:
FileTransferDeviceService fileTransferDeviceService = (FileTransferDeviceService) inkDevice.getDeviceService(DeviceServiceType.FILE_TRANSFER_DEVICE_SERVICE);
and enable it:
fileTransferDeviceService.enable(new FileTransferCallback() {
            @Override
            public boolean onFileTransfered(InkDocument inkDocument) {
                ...
            return true;
            }
      });
through the callback, you will receive the InkDocuments containing layered Ink data.
5.3. LiveMode - Get Real Time Inking
In this section, we would like to receive the data created on the Ink Device in real time.
The first thing is to make sure that this feature is supported by the device.
Then we are ready to get the instance of the LiveModeDeviceService:
LiveModeDeviceService liveModeDeviceService = (LiveModeDeviceService) inkDevice.getDeviceService(DeviceServiceType.LIVE_MODE_DEVICE_SERVICE);
and enable it:
liveModeDeviceService.enable(new LiveModeCallback() {
      @Override
      public void onStrokeStart(PathChunk pathChunk) {
        ...
      }

      @Override
      public void onStrokeMove(PathChunk pathChunk) {
        ...
      }

      @Override
      public void onStrokeEnd(PathChunk pathChunk, InkStroke inkStroke) {
        ...
      }

      @Override
      public void onNewLayerCreated() {
        ...
      }

});
There are three callbacks through which you receive data in real time:
- onStrokeStart - A new stroke was started.
- onStrokeMove - The previously started stroke is now continued.
- onStrokeEnd - The stroke was finished. Notice that contrary to the previous two methods, this one also provides as a parameter
InkStroke- containing the data describing the whole stroke. - onNewLayerCreated - A new layer was created.