Overview
Introduction
The Wacom Signature SDK includes a range of software components which were developed by the company Florentis Ltd., acquired by Wacom in 2011. Until such time as full rebranding has been completed there will be some residual Florentis name references.
- When integrated with an application, the Signature Components allow handwritten signatures to be captured from a pen tablet with the signature data securely bound to a document. A captured signature can be displayed in the signed document providing a visual record of the act of signing.
The signature display is designed to give an error indication if the underlying document is changed in some way. The programming interface of the Signature SDK consists of the following COM objects:
| Component | Description |
|---|---|
| SigObj | Encapsulates a captured handwritten signature, including raw pen data, context of capture, and a hash value of the signed document. The SigObj is central to the SDK and the remaining COM object provide support for its creation and display. Separate Wacom products can be used for forensic examination of the signature data (SignatureScope) or for comparison using Static or Dynamic signature verification toolkits. API is not available to extract the raw pen data, to avoid the possibility of forgery. |
| Licence | Used to pass licence data to the other COM objects. The object is initialised with a licence text string which defines the level of operations allowed for the signature controls. The SDK includes an evaluation licence which is replaced in a production system by a company-specific licence. |
| SigCtl | ActiveX control that provides the interface for creating and displaying a Signature object (SigObj). |
| SigCtlXHTML | Extension of SigCtl providing automated document checking for Internet Explorer-based HTML applications. |
| Hash | Calculates a one-way hash ('message digest') of a data set, thus providing a unique and reliable 'digital fingerprint' of the contents of a document or form. |
| Key | Protects the integrity of data, thus providing a means of detecting any change to the original signature data. |
| ImgCtlXHTML | An ActiveX control that can be used to display a graphic image from an encoded text string. |
| DynamicCapture | Provides the user interface for the capture of a handwritten signature and the creation of an associated Signature object (SigObj). |
| eSeal | Provides the user interface for the insertion of an 'eSeal' image, optional capture of a handwritten signature and the creation of an associated Signature object. In some cultures, a stamp or seal, rather than a handwritten signature, is the traditional way of endorsing a document; in other cases there may be situations where a tablet is not available but a signing process is still required. The eSeal mechanism can be used in either of these cases to sign a document with an eSeal image and, optionally and if a tablet is available, a handwritten signature superimposed over the image. |
| WizCtl | the Wizard control provides a means of scripting the signing process using interactive displays on the signature tablet. |
Signature Enabled Windows Application
Capture and Display Signature
Design the user interface of the application (eg a .Net Windows Form) so that it displays the data to be signed and displays the ActiveX signature control (SigCtl).
In Visual Studio use Tools…Choose Toolbox Items then add the .NET component Florentis.InteropAxFlSigCOM.dll (via Browse...). The control can then be inserted in the form using the Toolbox.
The control will appear as an unsigned 'signature area':

Add code (activated by a user action such as clicking a button) to capture a signature and bind it to a message digest of the data set, as follows:
- Check that the data set is complete (ie. document has been correctly loaded or all mandatory input fields have been completed).
- Create a Hash object and (repeatedly) use its 'Add' method to add all elements of the data set to the hash.
- Determine the name of the signatory (user) and his or her reason for signing
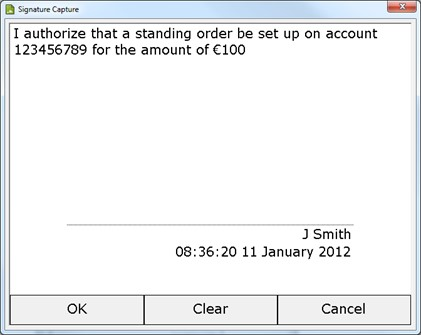
- Invoke the 'Capture' method of the DynamicCapture object, passing it the signatory name and the reason for signing and Hash object.
The 'Capture' method displays the Capture Window, as shown below. An attached tablet will be used to capture the user's signature and bind it to the supplied Hash object, if any.
- Pressing the 'OK' button will complete this operation and dismiss the window.
- Pressing the 'Clear' button will clear all signature 'ink' from the window, if any is present; pressing the 'Cancel' button will dismiss the window without capturing a signature.
- The 'OK' and 'Clear' buttons only become accessible (enabled) once signature 'ink' has been entered.)
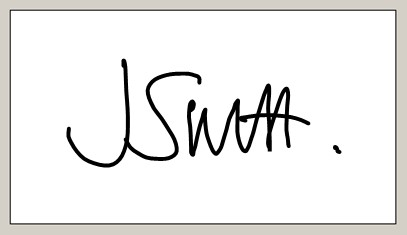
Following capture, the control displays the signature:
Check Signature
To check a signature, add code to determine if the data set has been modified since it was signed (activated by a user action such as clicking a button).
- Create a Hash object and (repeatedly) use its 'Add' method to add all elements of the data set to the hash. The order in which data set elements are added must be identical to the sequence used prior to capture.
- Use the control's 'Signature' property to obtain a reference to its internal SigObj object in which is contained the signature data itself.
- Invoke the 'CheckSignedData' method of SigObj, supplying the Hash object, in order to determine whether or not the data
set has been modified since it was signed.
- If a change is detected, the signature will be displayed crossed out. The application can also inform the user of the result by means of a pop-up window, a text field, or similar.
Code can be added to check the integrity of the signature data in the control's SigObj object to ensure that it has not been modified (whether maliciously or accidentally) by means of the object's 'CheckIntegrity' method.
NB: For this to be possible, an application-defined Key object must have been supplied when the signature was captured.
Save Signature
Code can be added to extract the signature data or other signature attributes by means of the properties of the control's SigObj object.
To store the signature data in a database, access it using the object's 'SigData' and 'SigText' properties, which provide the signature data in binary and text form respectively.
- Conversely, these properties can be used to populate an unsigned signature control with signature data retrieved from a database or another application, allowing the signature image to be displayed in the control.
Similarly, the object's 'When', 'Who' and 'Why' properties provide the time of signature capture, the signatory name and the reason for signing respectively.
Wizard Control Signing Procedure
Capture and Display Signature (STU pen tablets only)
The Wizard Control allows the user to be guided through a set of instruction pages displayed on the signature tablet LCD display. Each page requires a selection by tapping the pen on the tablet surface (e.g. 'Next'). The ActiveX control was originally developed for use in Internet Explorer, scripted by JavaScript support code. It can, however, be used in any other application which supports COM components and scripting.
In a typical application, the signing process follows the sequence:
- The client requests a document
- The server creates the document and a dedicated Viewer page
- The client views the document via the Viewer page
The Viewer page provides the controls and displays the document to be signed. It contains the JavaScript required to action the control buttons as well as the Wizard Script which defines the signing process. The Wizard control can also be used to configure the signature tablet to display a simple keyboard, such as a numeric keypad for entering PIN code numbers.
Scripting Features
Each document can have its own set of rules for the signing process, which are assembled when the Viewer page is created on the server. When the Viewer is opened by the client, the document is displayed and the signing process can begin. Each step in the signing process contains:
- Display Setup: draw the text and user controls on the Pad Display
- Event Handler: response to user input on the tablet
The script can add a number of entities to the tablet display:
- Text e.g., instructions or explanations
- Images can be passive (e.g. a company logo) or act like a button and respond to clicks
- Button procedure control (e.g. Next/Cancel)
- Checkbox application options
- Input PIN code input
- Simple graphics lines, rectangles and ellipses
The script can, in addition, associate a signature control or signature object with the Wizard control. Captured signature data is then saved to the control or object when an OK button is clicked.
Document Display
The sequence of code snippets below shows an example signing procedure using the Wizard control.
- A Viewer page displays the control buttons and the document to be signed.
- In the screenshots, the Viewer support script has opted to reproduce the tablet display in a popup window.
- The same displays also appear on the tablet LCD where user input is made with a pen.
The wizard is opened and looks for a device to connect to:
void DlgData::startWizard()
{
  printText("startWizard\r\n");
  if (pWizCtl->PadConnect())
  {
    scriptIsRunning = true;
    switch (pWizCtl->PadWidth)
    {
    case 396:
      thePad = new(std::nothrow) tPad("STU-300", 60, 200, 200, 8, 8, 16, 70); // 396 x 100
      printText("STU-300\r\n");
      break;
    case 640:
      thePad = new(std::nothrow) tPad("STU-500", 300, 360, 390, 16, 22, 32, 110); // 640 x 800
      printText("STU-500\r\n");
      break;
    case 800:
      thePad = new(std::nothrow) tPad("STU-520/530/540", 300, 360, 390, 16, 22, 32, 110); // 800 x 480
      printText("STU-520, STU-530 or STU-540\r\n");
      break;
    case 320:
      thePad = new(std::nothrow) tPad("STU-430", 100, 130, 150, 10, 12, 16, 110); // 320 x 200
      printText("STU-430\r\n");
      break;
    default:
      printText("No compatible device fount\r\n");
    }
    step1();
  }
  else
    printText("Unable to connect to tablet\r\n");
}
The wizard script controls the signing process by presenting a number of screens on the tablet, prompting for confirmation or selection of options, leading to signature capture. 'Next' is pressed on the tablet:
void DlgData::step1()
{
  pWizCtl->Reset();

  // insert checkbox
  pWizCtl->PutFont(thePad->textFont);
  pWizCtl->AddObject(ObjectCheckbox, "Check", "centre", "middle", "I have read and I accept the terms and conditions", 2);

  // insert the buttons
  pWizCtl->PutFont(thePad->buttonFont);
  pWizCtl->AddObject(ObjectButton, "Cancel", "left", "bottom", "Cancel", thePad->buttonWidth);
  pWizCtl->AddObject(ObjectButton, "Next", "right", "bottom", "Next", thePad->buttonWidth);

  pWizCtl->SetEventHandler(this);
  pWizCtl->Display();
}
The user will then be prompted to sign. 'OK' is pressed to complete the process and the captured signature is displayed in a Signature control embedded in the document.
void DlgData::step2()
{
  pWizCtl->Reset();

  // insert message
  pWizCtl->PutFont(thePad->textFont);
  pWizCtl->AddObject(ObjectText, "txt", "centre", "top", "Please sign below...", 0);

  // insert a signature line
  pWizCtl->PutFont(thePad->sigLineFont);
  if (strcmp(thePad->model, "STU-300") == 0)
  {
    pWizCtl->AddObject(ObjectText, "txt", "left", thePad->signatureLineY, "X..............................", 0);
  }
  else
  {
    pWizCtl->AddObject(ObjectText, "txt", "centre", thePad->signatureLineY, "X..............................", 0);
  }

  // insert the signature control
  pWizCtl->PutFont(thePad->textFont);
  pWizCtl->AddObject(ObjectSignature, "Sig", 0, 0, _variant_t(pSigCtl->Signature.GetInterfacePtr()));

  // provide who and why for sig capture
  pWizCtl->AddObject(ObjectText, "who", "right", thePad->whoY, _variant_t(L"J Smith"));
  pWizCtl->AddObject(ObjectText, "why", "right", thePad->whyY, _variant_t(L"I ceritify that the information is correct"));

  // insert the buttons
  pWizCtl->PutFont(thePad->buttonFont);
  if (strcmp(thePad->model, "STU-300") == 0)
  {
    pWizCtl->AddObject(ObjectButton, "Cancel", "right", "top", "Cancel", thePad->buttonWidth);
    pWizCtl->AddObject(ObjectButton, "Clear", "right", "middle", "Clear", thePad->buttonWidth);
    pWizCtl->AddObject(ObjectButton, "Ok", "right", "bottom", "Ok", thePad->buttonWidth);
  }
  else
  {
    pWizCtl->AddObject(ObjectButton, "Cancel", "left", "bottom", "Cancel", thePad->buttonWidth);
    pWizCtl->AddObject(ObjectButton, "Clear", "center", "bottom", "Clear", thePad->buttonWidth);
    pWizCtl->AddObject(ObjectButton, "Ok", "right", "bottom", "Ok", thePad->buttonWidth);
  }

  pWizCtl->SetEventHandler(this);
  pWizCtl->Display();
}